If you have a question, drop us a chat message in the bottom right of your screen between 9am - 6pm EST and someone from our team would be happy to help
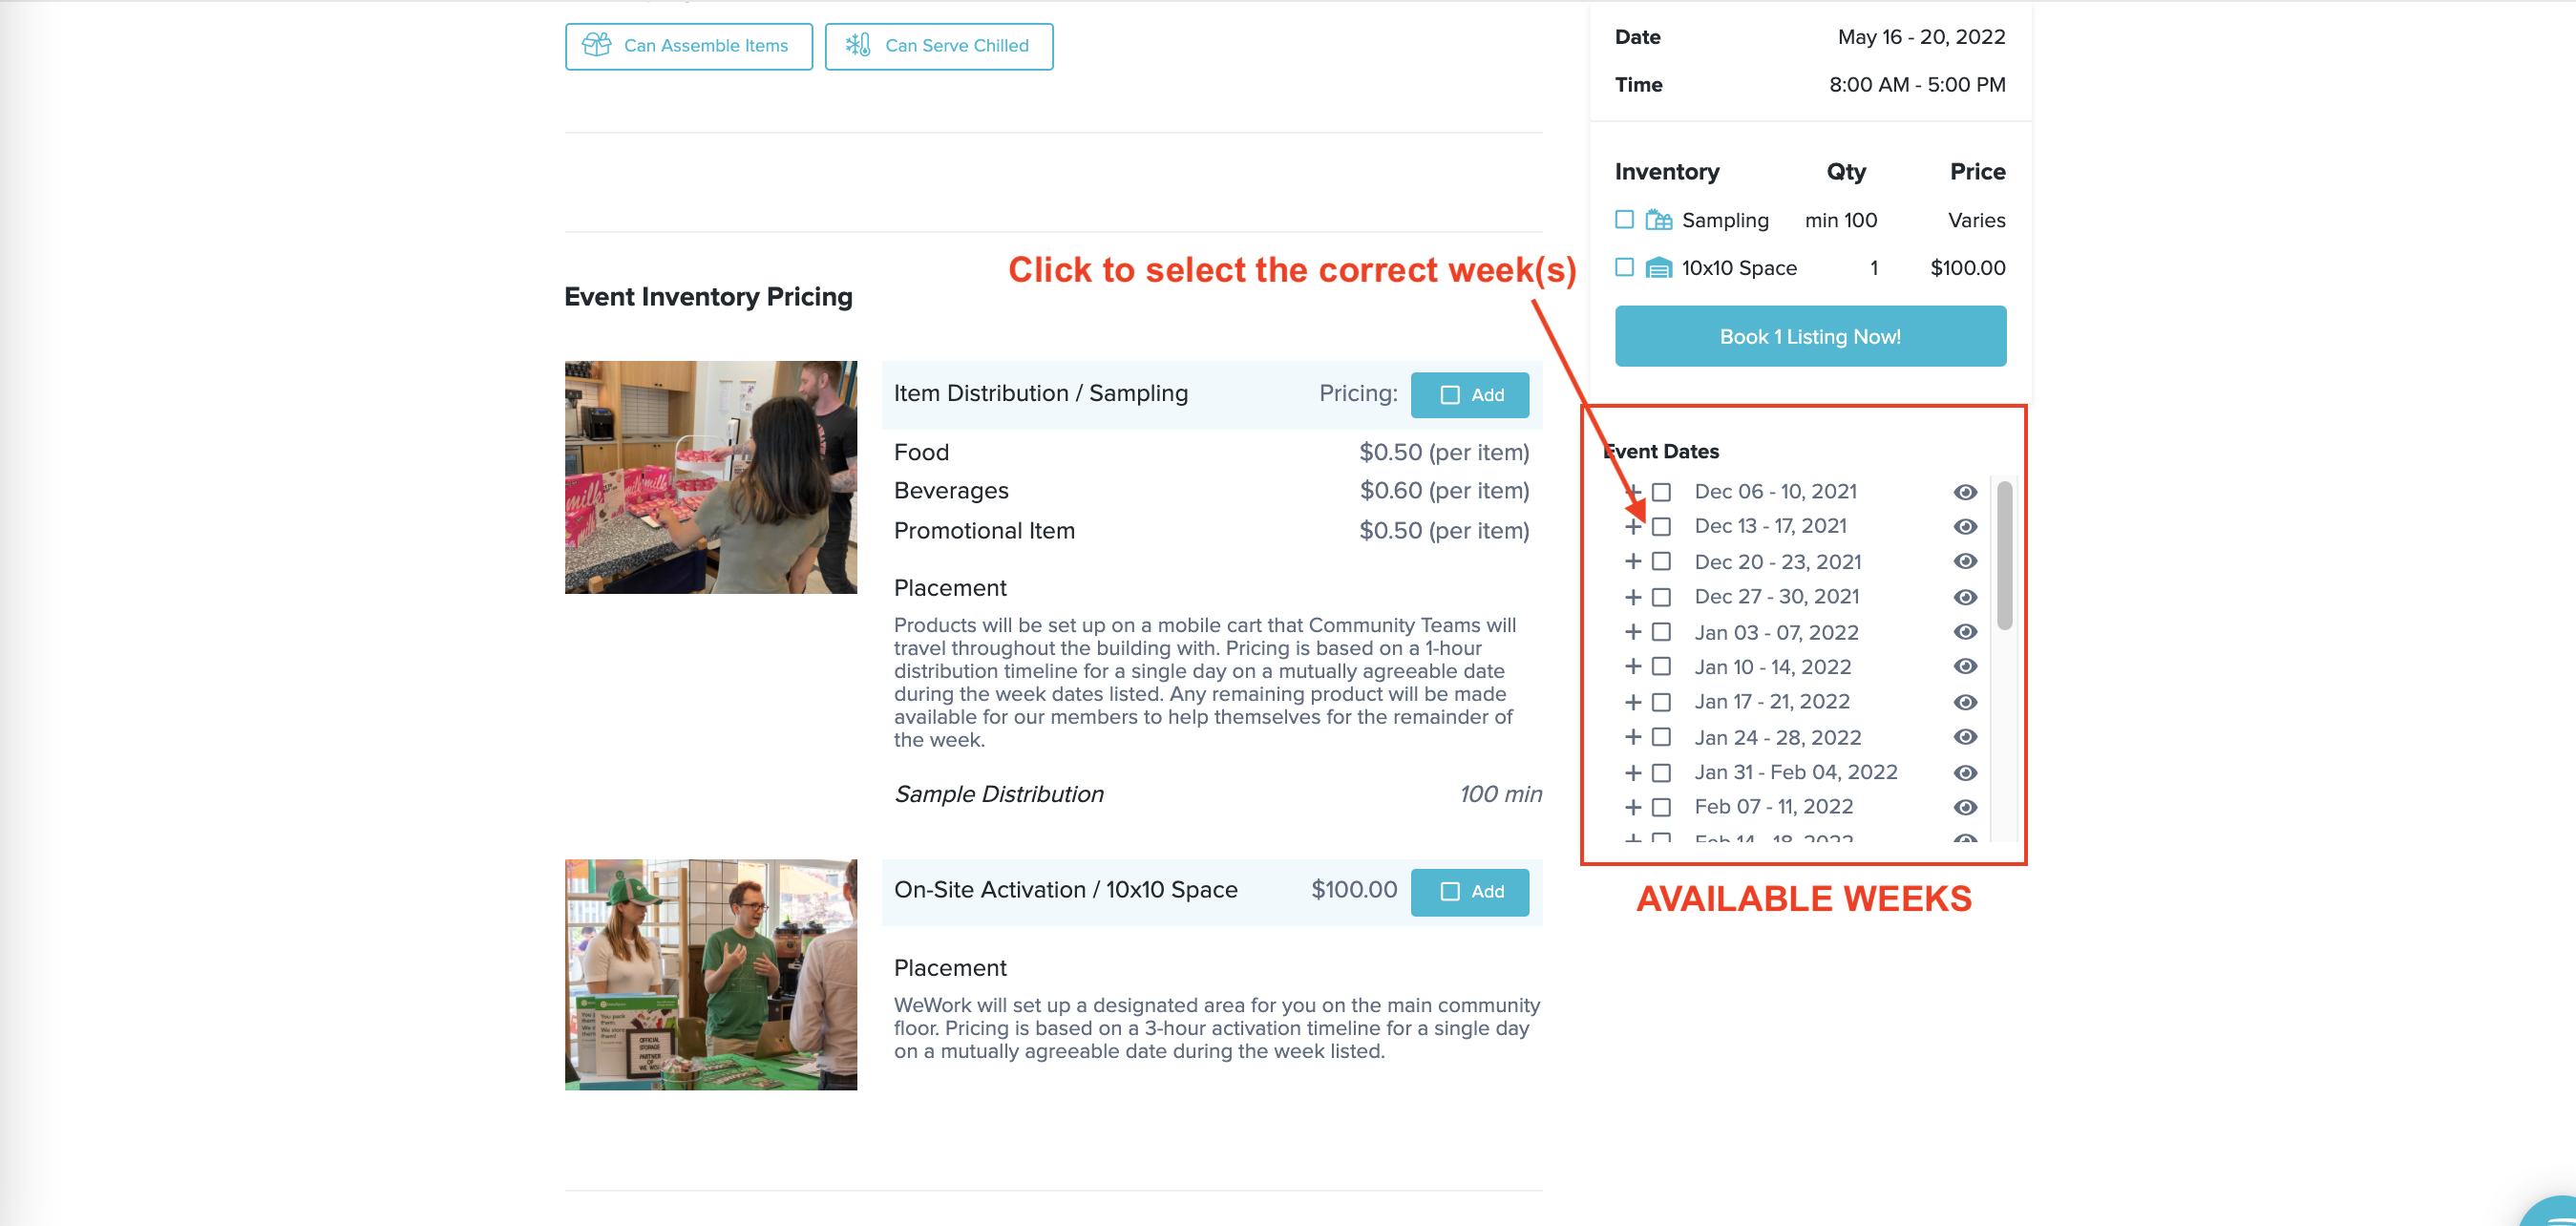
Step 1 - Add the Correct Week(s) to Your Cart
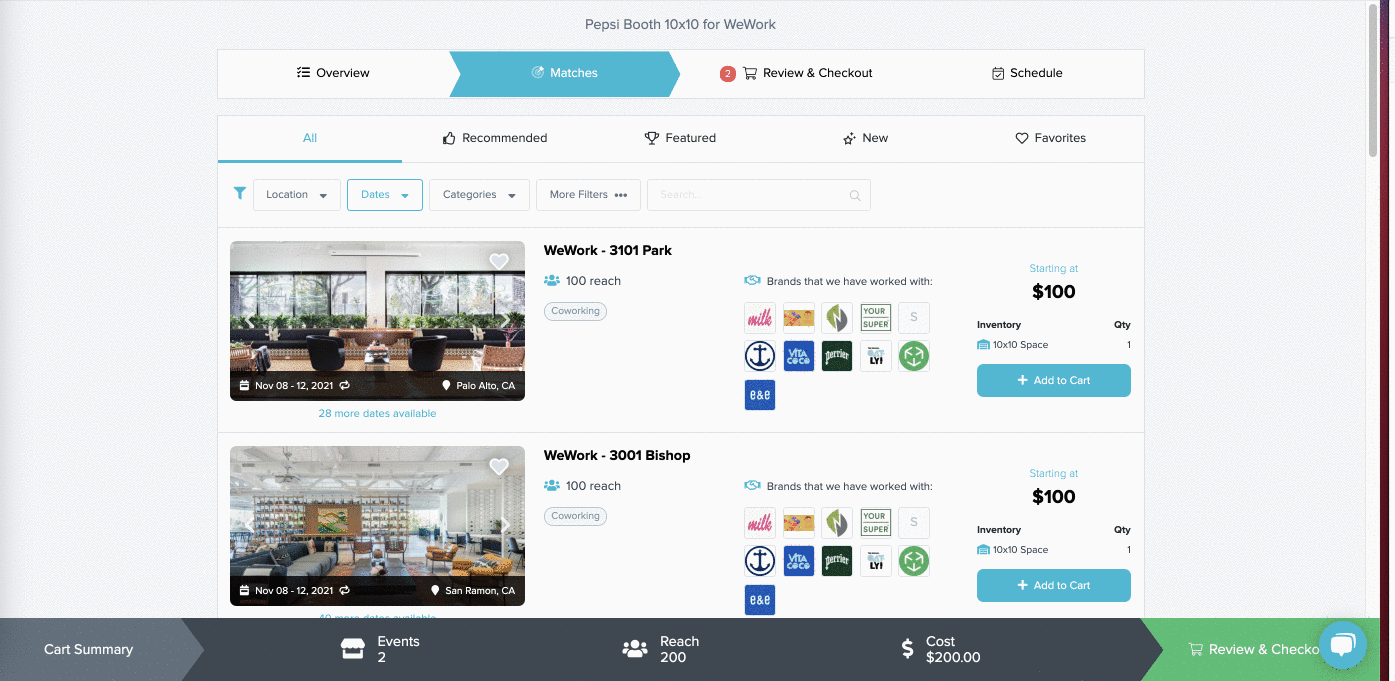
You can see all of the available weeks listed on the Event Dates section. Select all of the weeks that you want to have your activation. Once you complete the checkout and submit your offer you will be contacted within (48) business hours to confirm the date for your activation in the week(s) selected. The cost shown is the price per day.
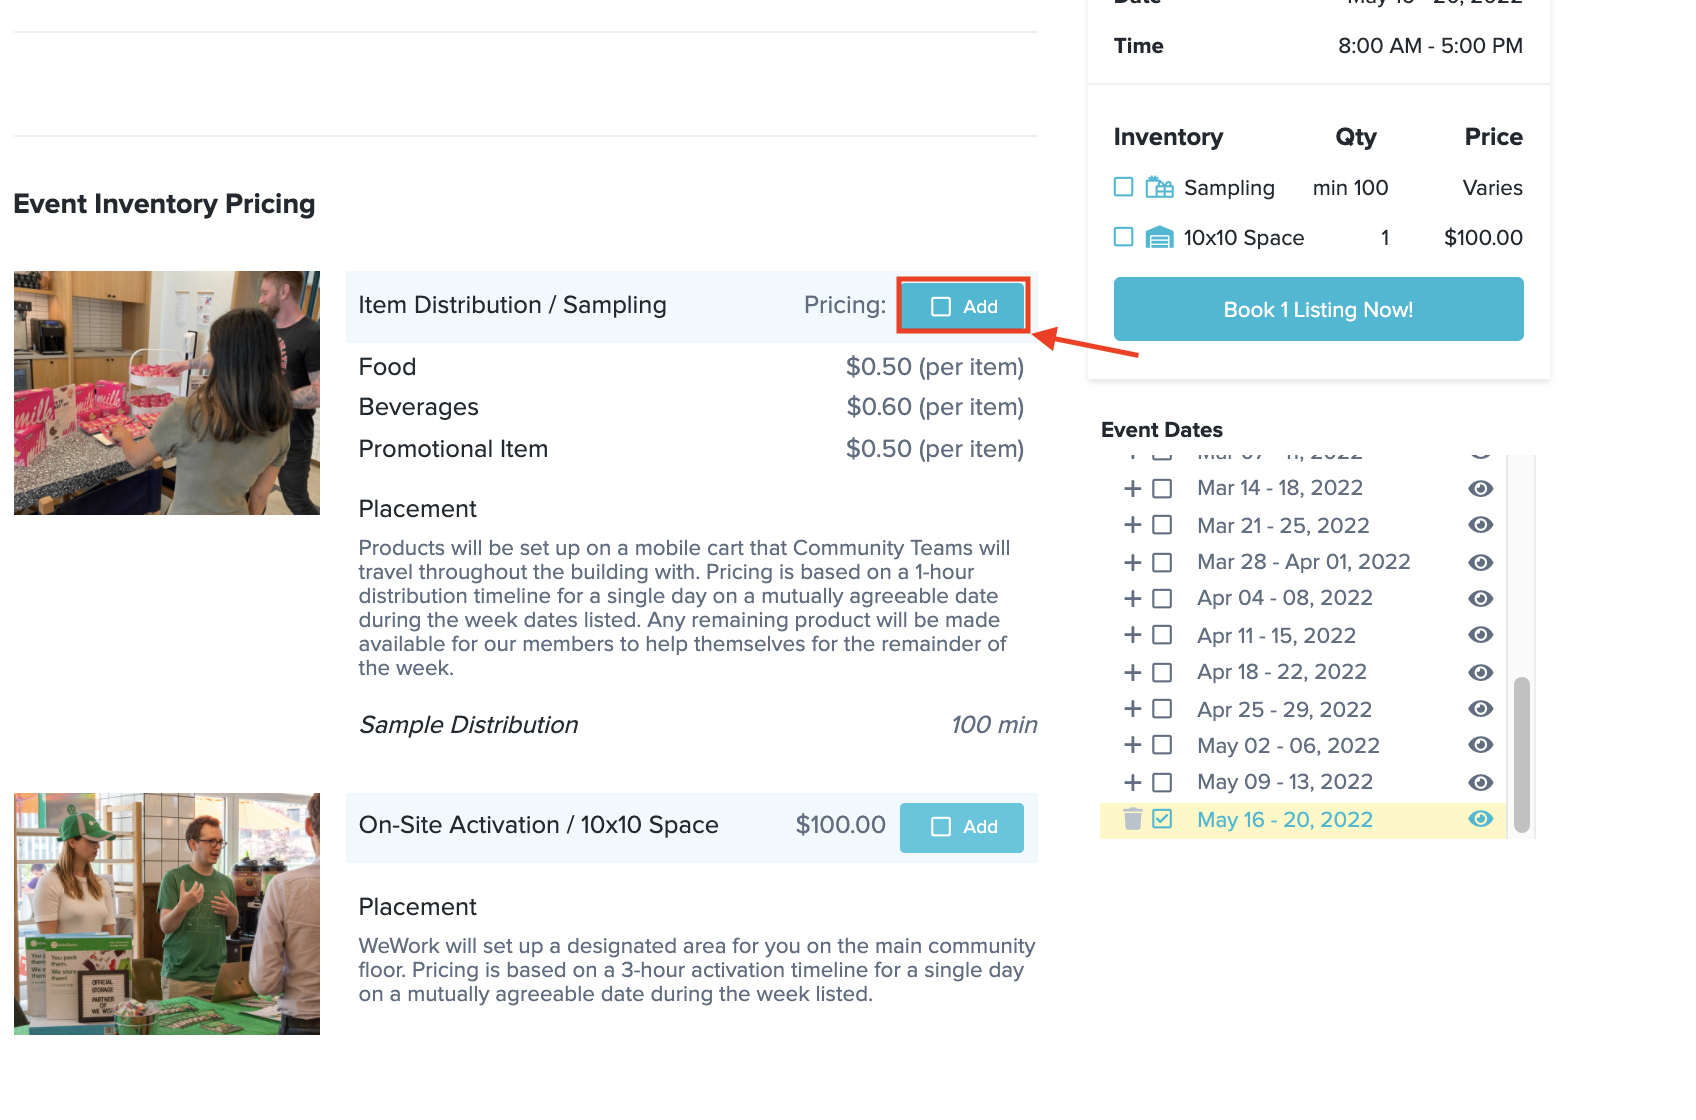
Click the add button next to the On-Site Activation / 10x10 Space. If you don't do this on the listing details, you can make this selection in a future step.
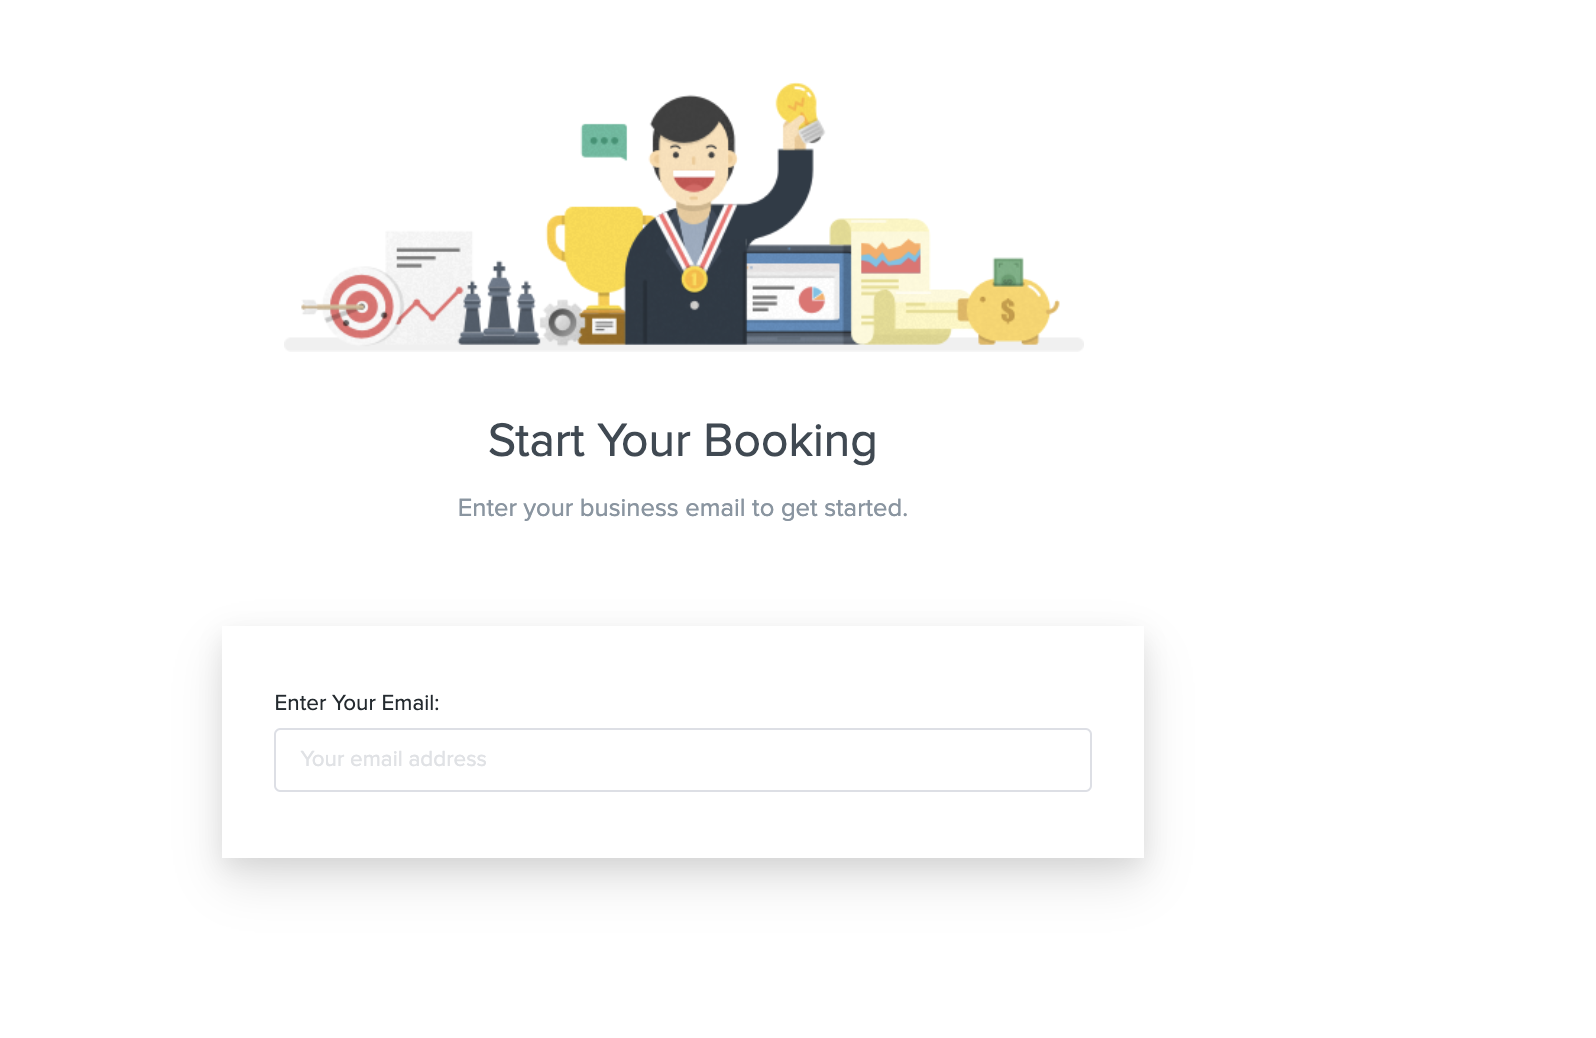
Step 2 - Enter Your Business Email
This will be the email address associated with your Recess account.
Step 3 - Select the Item Distribution Partnership Type
If you didn't make the partnership type selection on the listing details page shown in Step 1, you will need to select Item Distribution for your Partnership Type if you want to ship your item(s) to WeWork for their staff to distribute to members. Your team would not be on-site interacting with members.

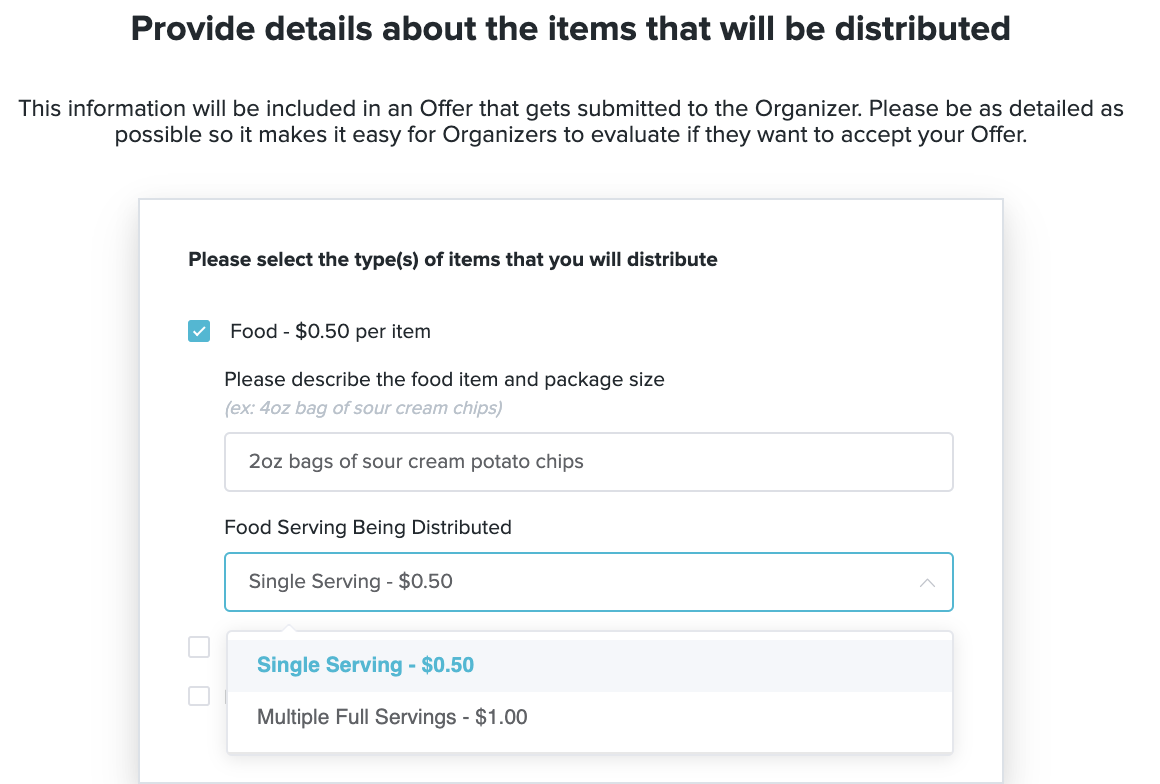
Step 4 - Enter Details About the Items Being Distributed
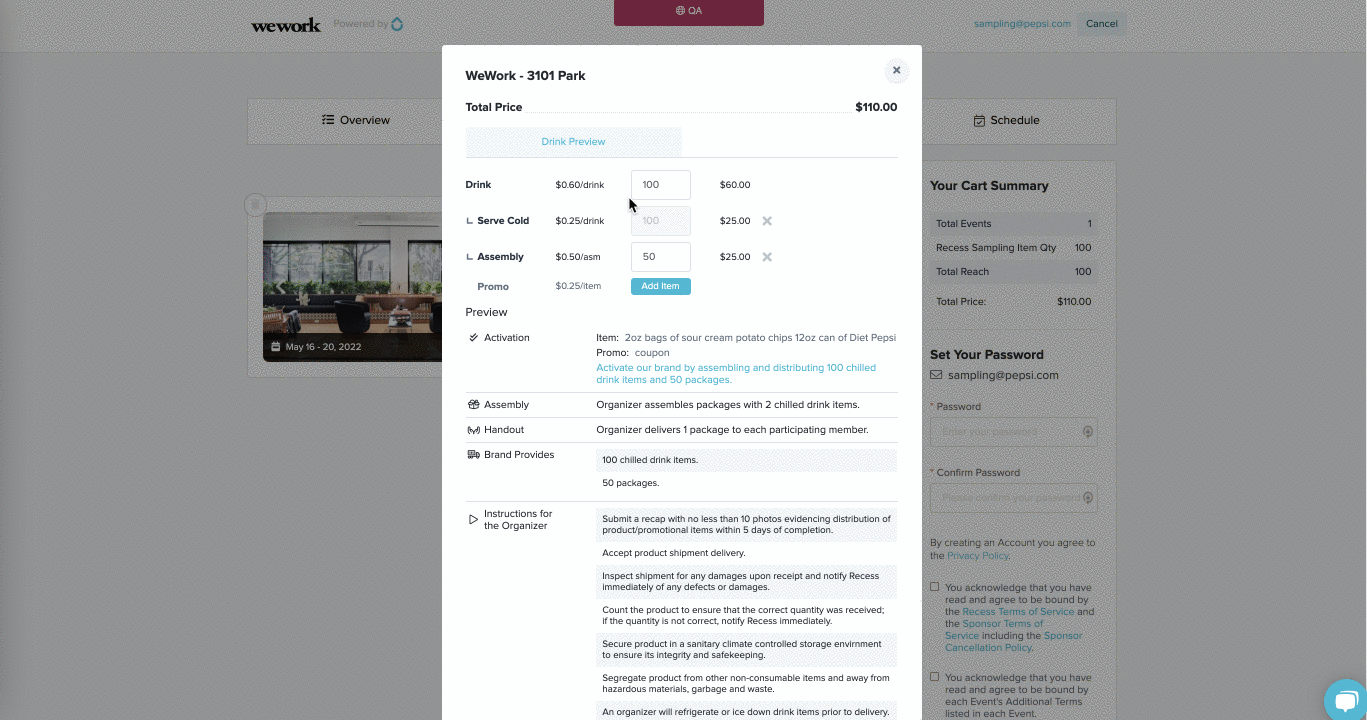
10ft x 10ft is the only space size available at WeWork locations. If you have any special requests please list those as well. Common special requests could include access to power, wifi, or a table provided.
Food:
-
-
- Select Food if you want to have food distributed at the WeWork Locations.
- Make sure to describe the food item and package size
- Make sure to select the correct food serving size. Single Serving sized items are $.50/item and Multiple Full Serving sized items are $1.00/item
-
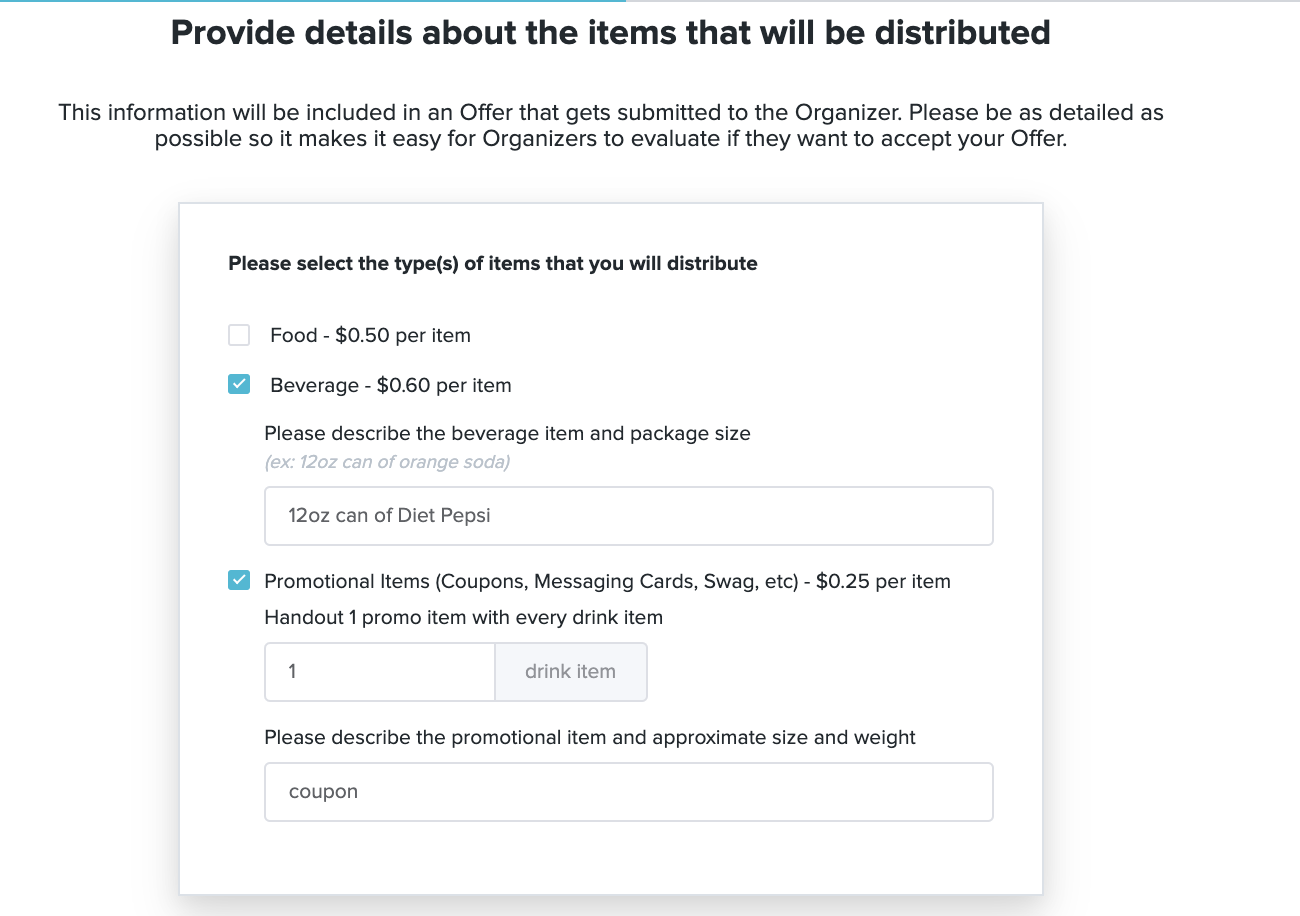
Beverage:
-
-
- Select Beverage if you want to have a drink item distributed at the WeWork Locations.
- Make sure to describe the drink item and package size
- You can choose at the step below if you want to request it to be served cold for an additional $.25 per beverage
-
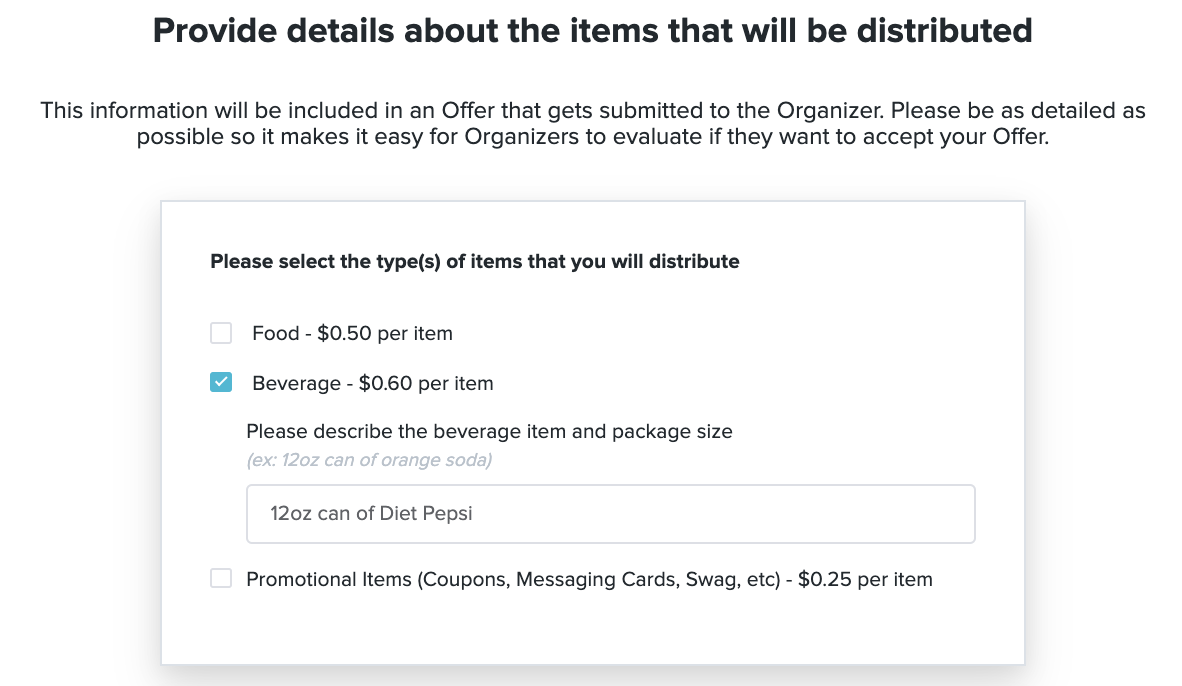
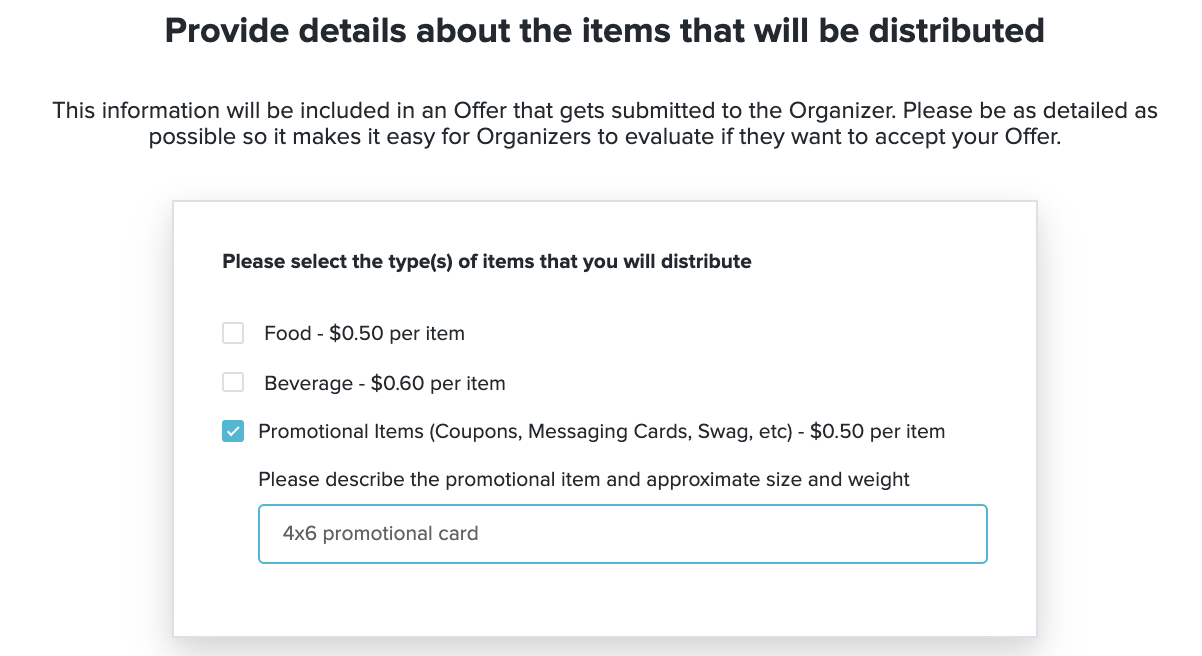
Promotional Items:
-
-
-
-
- Select Promotional Items if you want to have a promotional item distributed at the WeWork Locations.
- The most common types of Promotional Items including coupons, messaging cards, discount codes, etc
- You can select to only have Promotional Items distributed for a cost of $.50/item but if you are having a Promotional Item handed out with each food or beverage the additional cost is $.25/item.
-
-
-
-
-
-
-
- You can adjust the number of promo items handed out with each food or beverage item
-
-
-
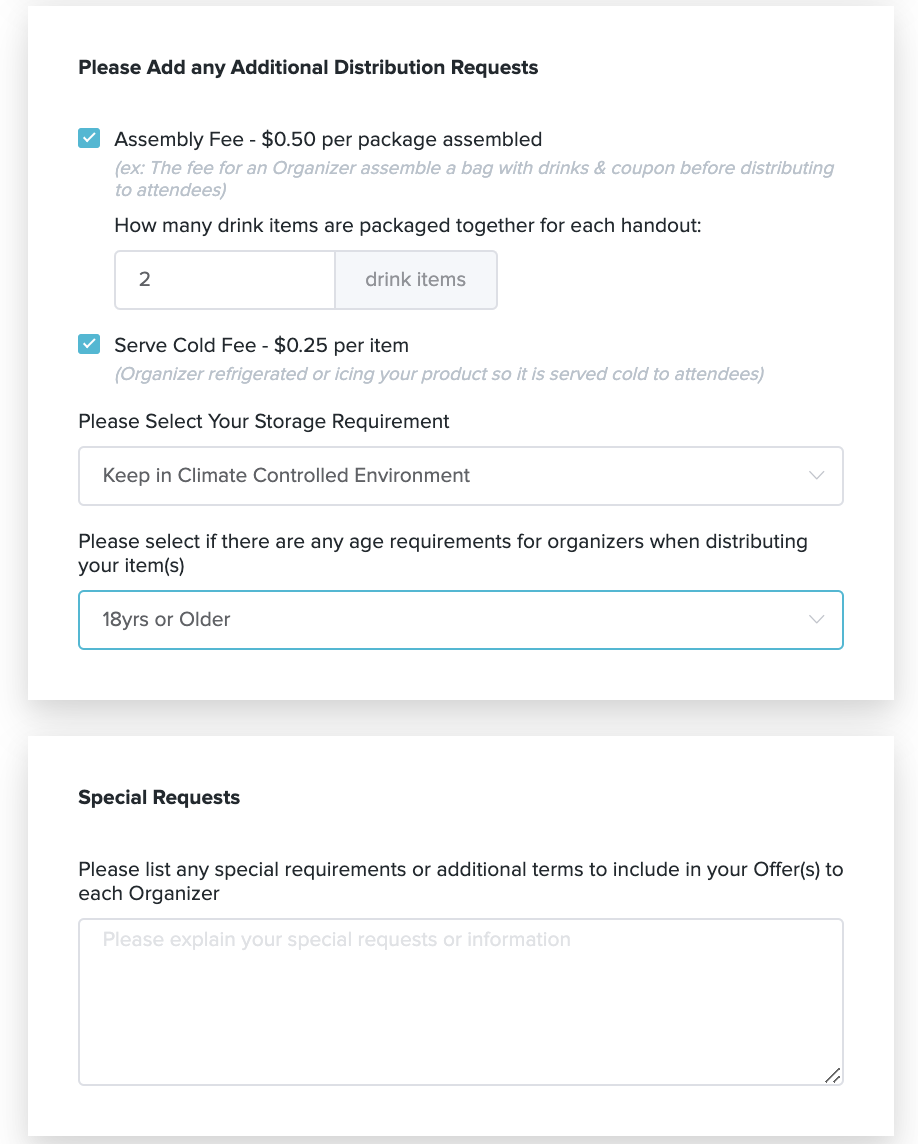
Step 5 - Enter Any Additional Distribution or Special Requests
You can add additional distribution requests that correspond to the item being distributed
- Assembly fee
- Selec Assembly Fee if you want to have WeWork staff assemble a package for you for $.50/package. The most common example is paying to assemble a gift bag with your food or beverage item(s) and a promotional item like a coupon. Brands are responsible for shipping all items including the bags to each location
-
- Please add the ratio for how many of your items should be packaged together for each handout. For example if you want 2 drinks and 1 coupon to be handed out in your package
- You would select Drink item & Promotional Item and have 2 drink items handed out for every 1 promotional item (see example below)
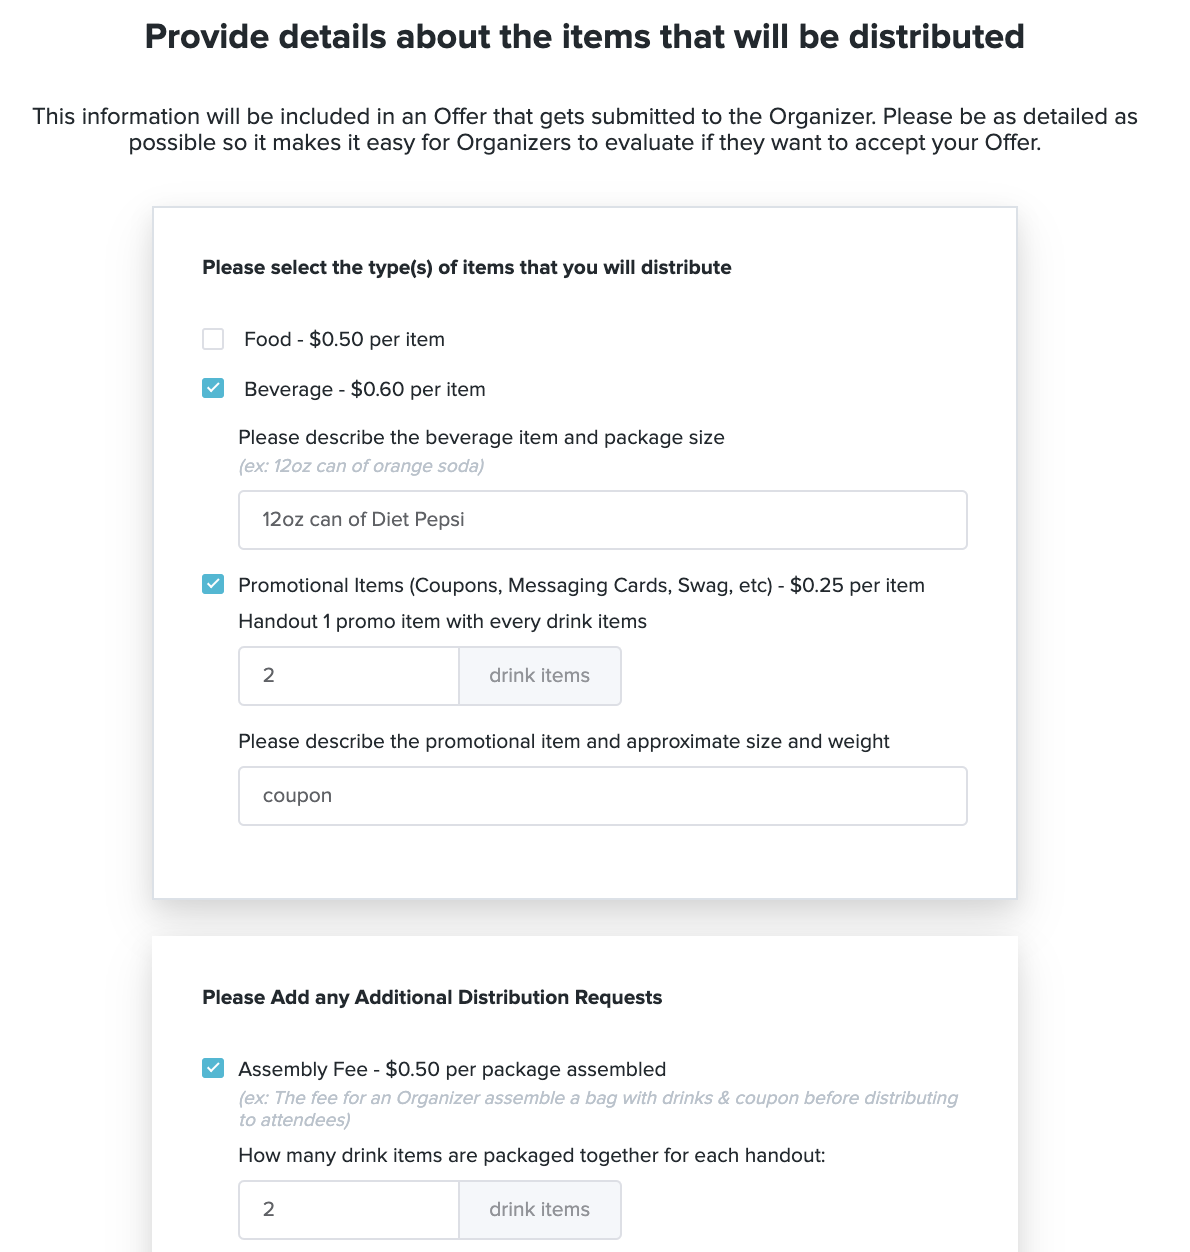
- Please add the ratio for how many of your items should be packaged together for each handout. For example if you want 2 drinks and 1 coupon to be handed out in your package
-
- Selec Assembly Fee if you want to have WeWork staff assemble a package for you for $.50/package. The most common example is paying to assemble a gift bag with your food or beverage item(s) and a promotional item like a coupon. Brands are responsible for shipping all items including the bags to each location
- Serve Cold Fee
- Select Serve Cold Fee if you want to have WeWork staff serve your item cold by refrigerating it or serving it on ice so it is cold when members receive the item.
- Storage Requirements
- Select any special storage requirements for your item
- Age Requirements
- Enter any special age requirements to be followed when distributing your product
- Special Requests:
- Please enter any special requests that you would like to include in your offers to WeWork
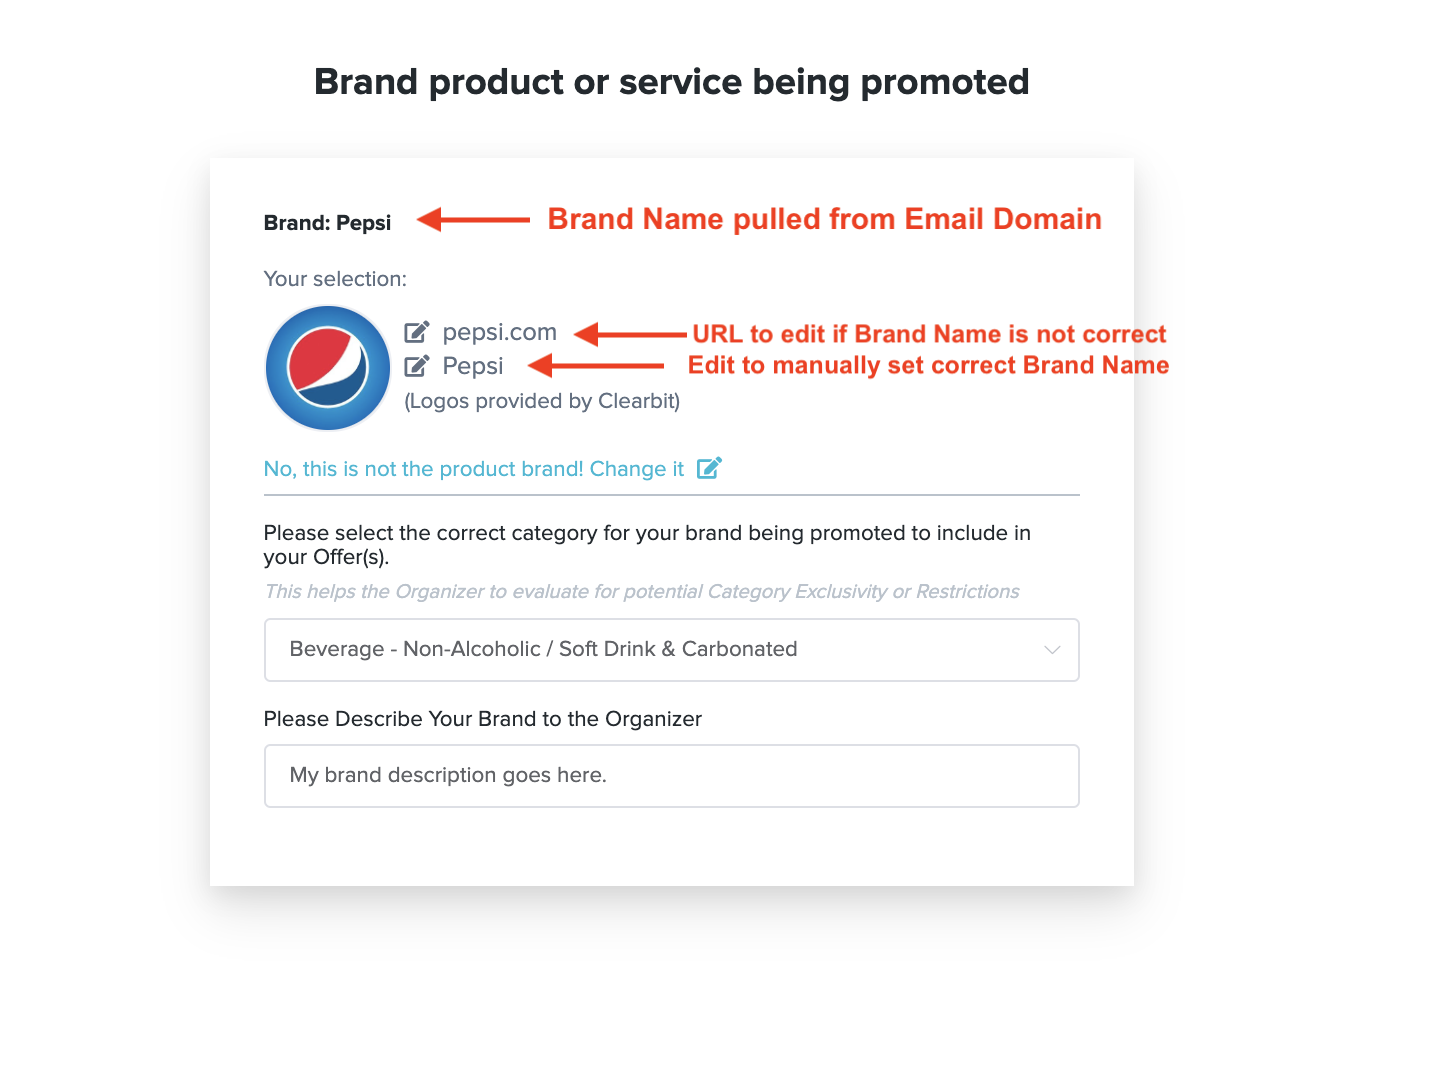
Step 6 - Enter the Correct Information for Your Brand & Product
It is important to add the correct information so that WeWork can evaluate if it is going to be a fit.
Brand Information - this is pulled from the email domain that you used to register. If it does not look correct edit the URL to enter the correct brand. If your URL does not pull in the correct rand name you can manually set the brand name below the URL field.
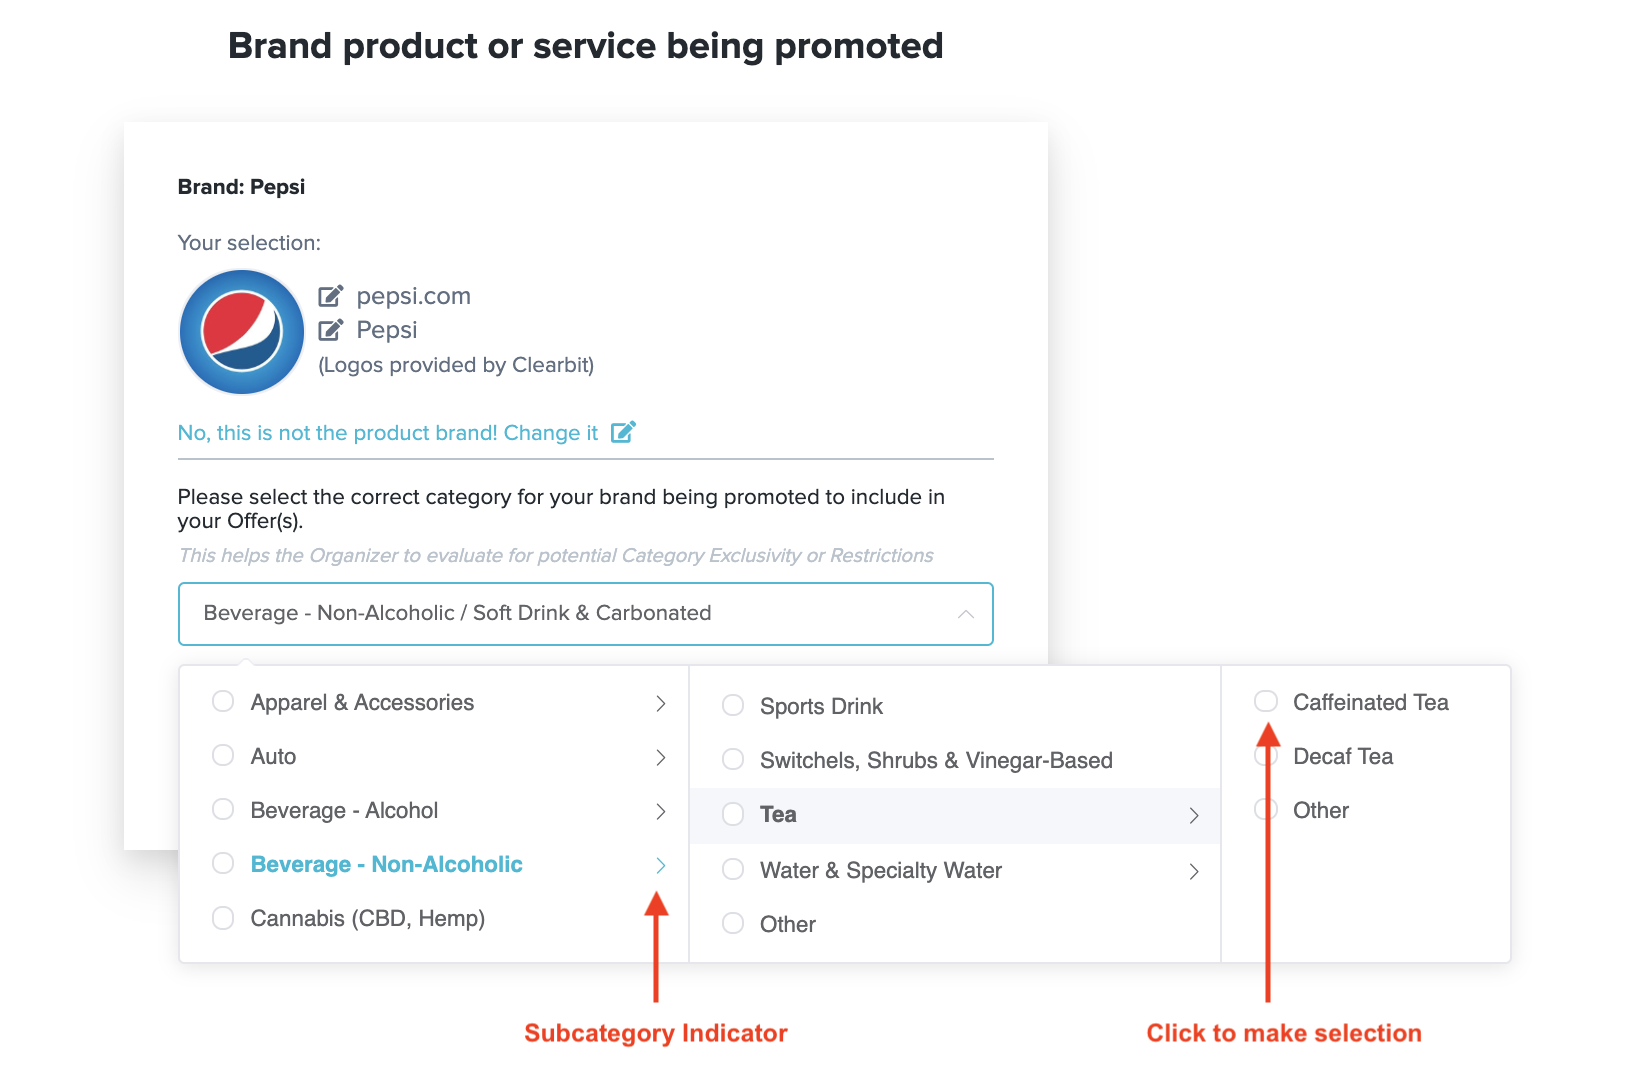
Step 7 - Set the Correct Brand Category & Enter Brand Description
It is important to set the correct category for the product/service that you will be promoting. This will help WeWork evaluate if your partnership is a good fit.
Try to be as accurate as possible, there is an indicator if the category has further subcategories that you can select from. Make your selection by clicking the circle.
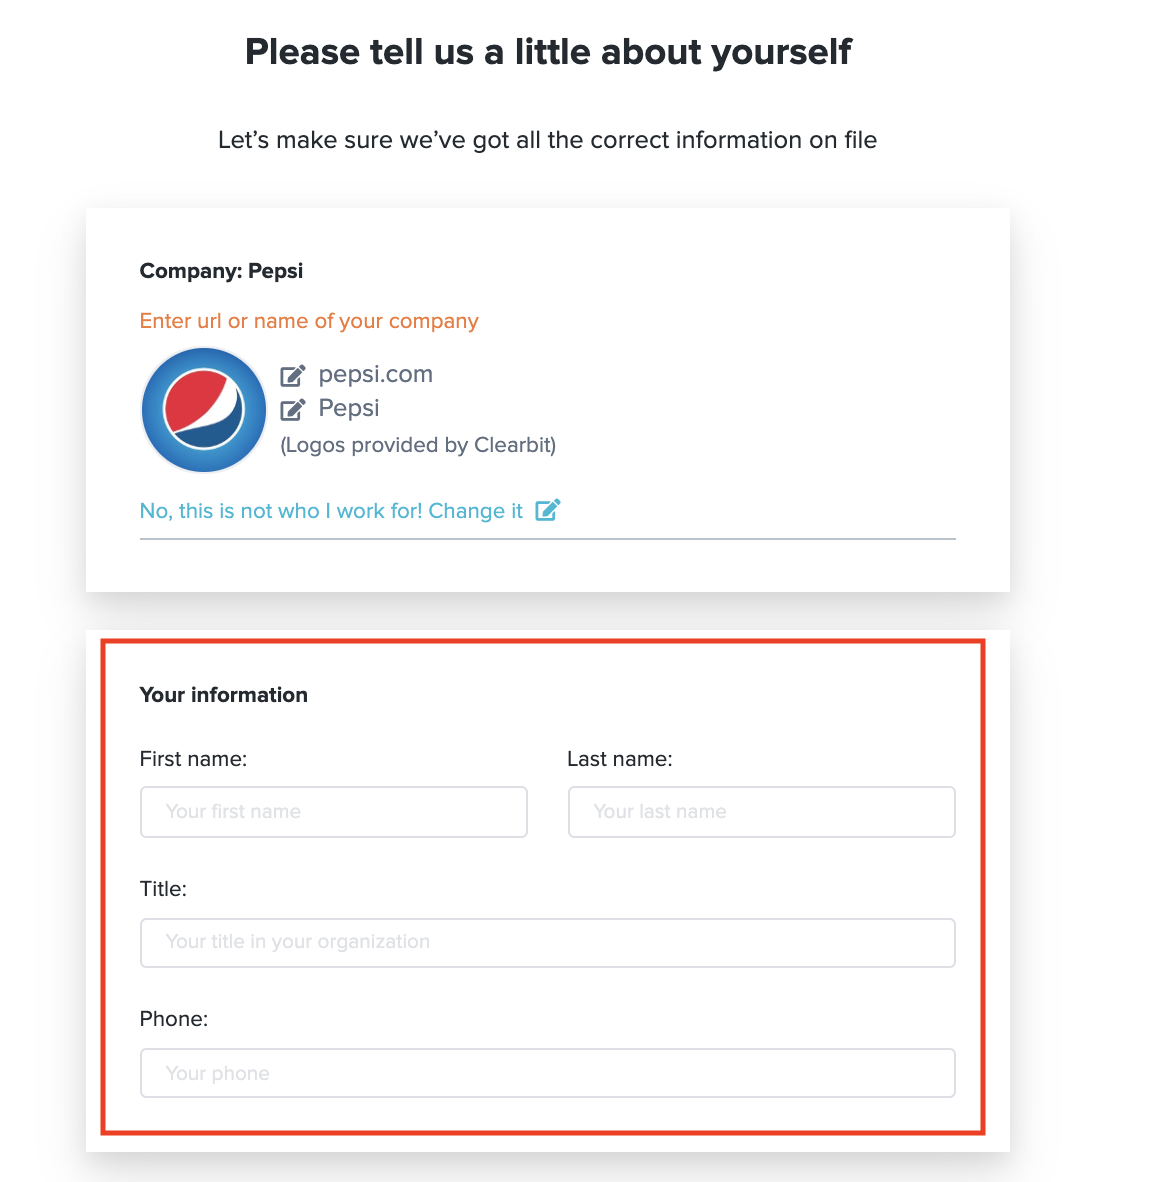
Step 8 - Enter Your Name, Title, & Phone
Under the Your information section, enter your name, title, and phone number. Please provide accurate information as this will be your contact information to coordinate your partnership.
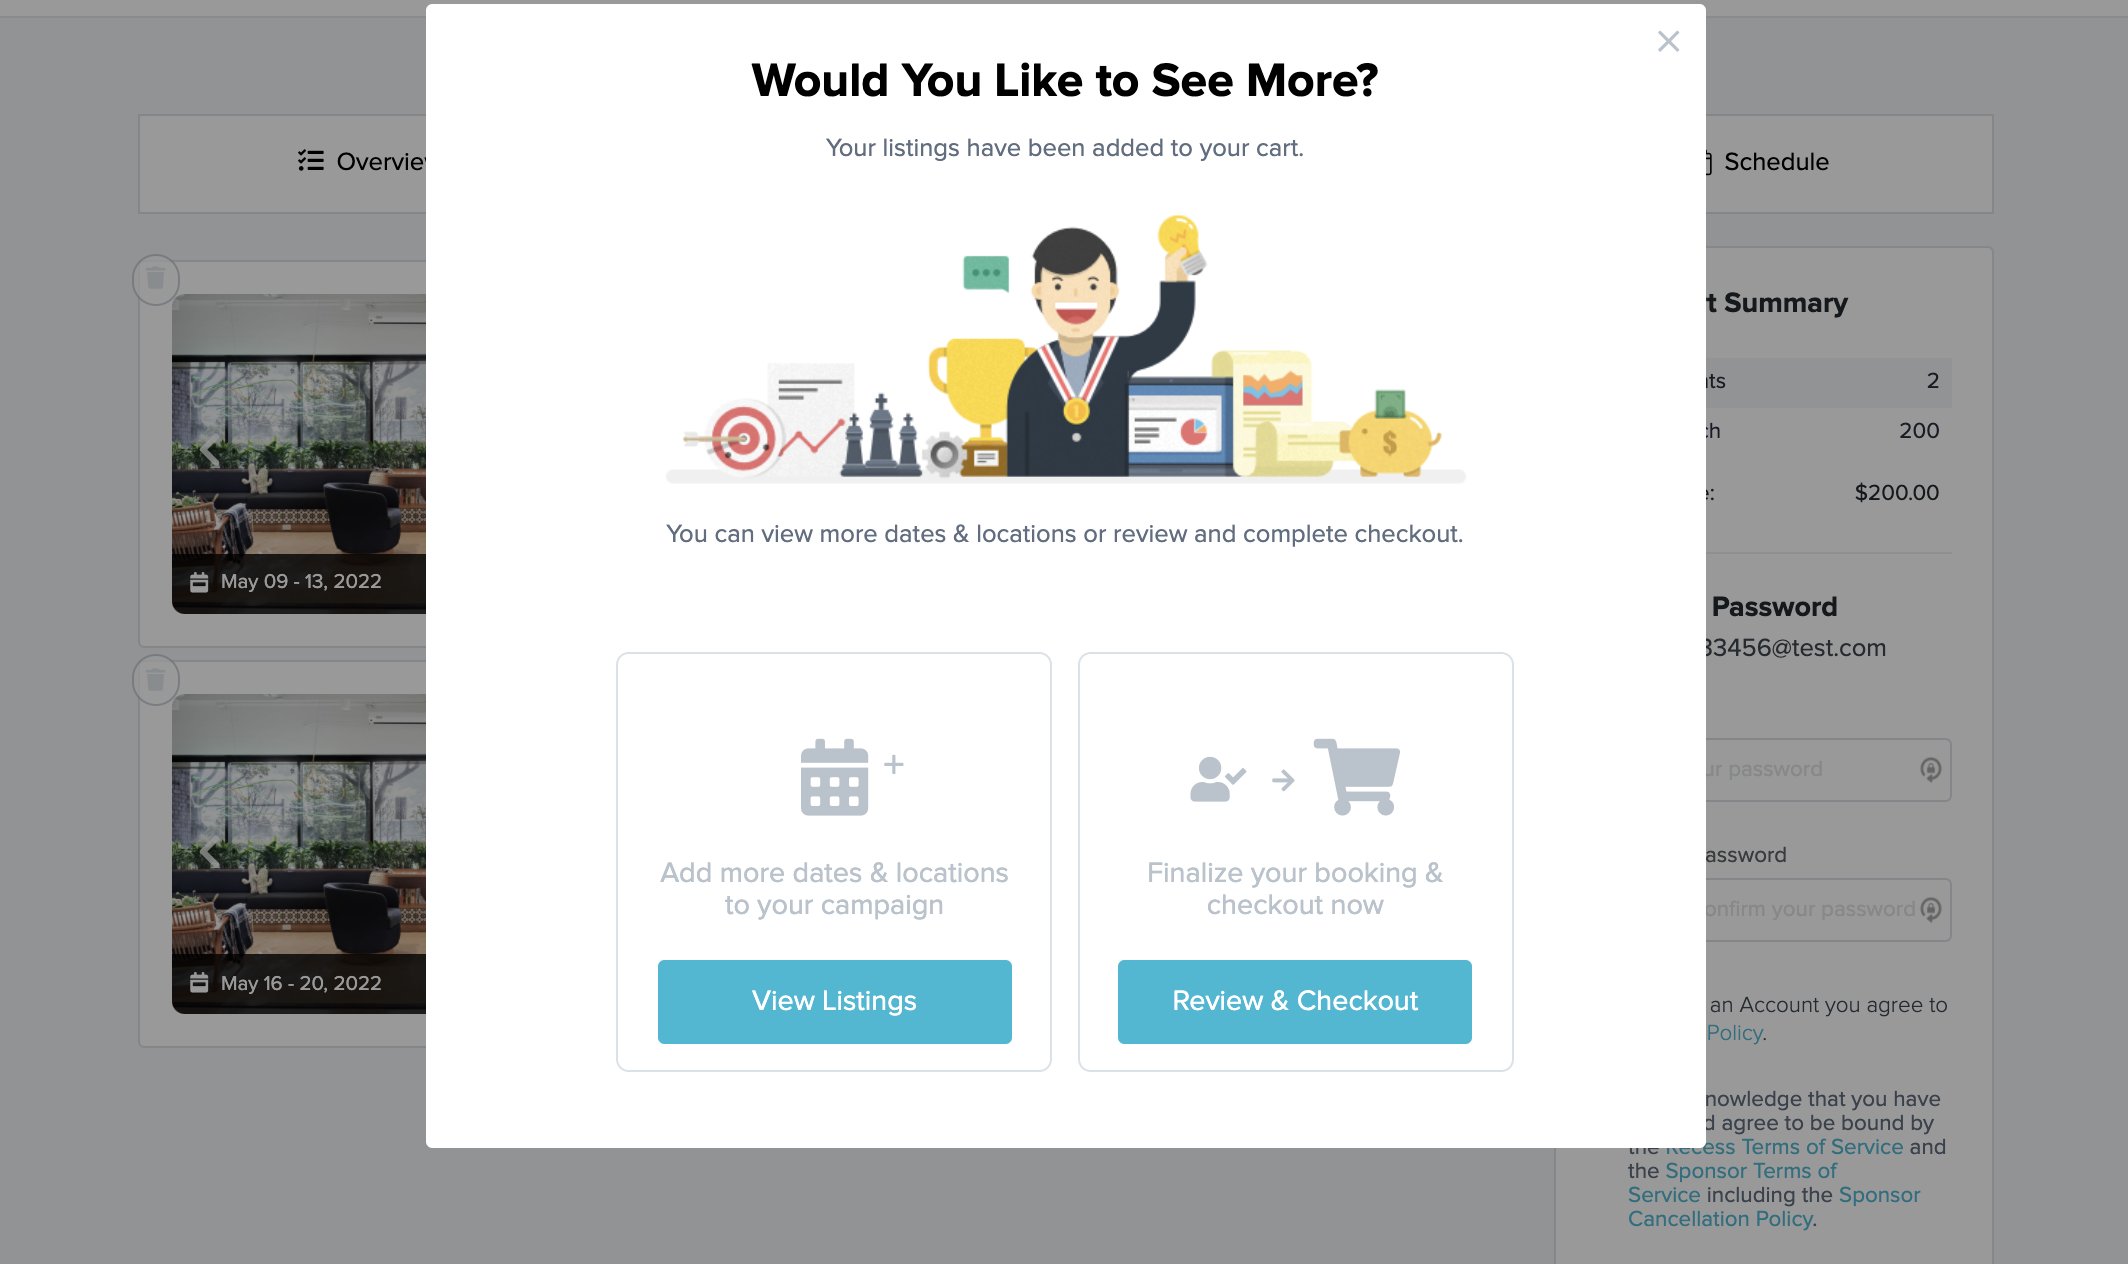
Step 9 - Choose to View More Locations or Checkout
If you are interested in viewing and adding more locations to your Cart before completing checkout click 'View Listings'.
If you are ready to review your Cart and checkout, click 'Review & Checkout'.
 Step 10 - Add More Locations
If you are interested in viewing and adding more locations to your Cart before completing checkout click 'View Listings'.
When you land on the Matches tab, you can view all the available locations. Click on each listing to view the listing details. Select the date(s) you want to add to your Cart.
Step 11 - Edit Item Quantities in Your Cart
You can adjust the number of items in your cart. If you have selected Assembly, Serve Cold, or Promotional Items and set ratios, these will automatically adjust based on those ratios.
You can add or remove any items and adjust the quantities as needed.
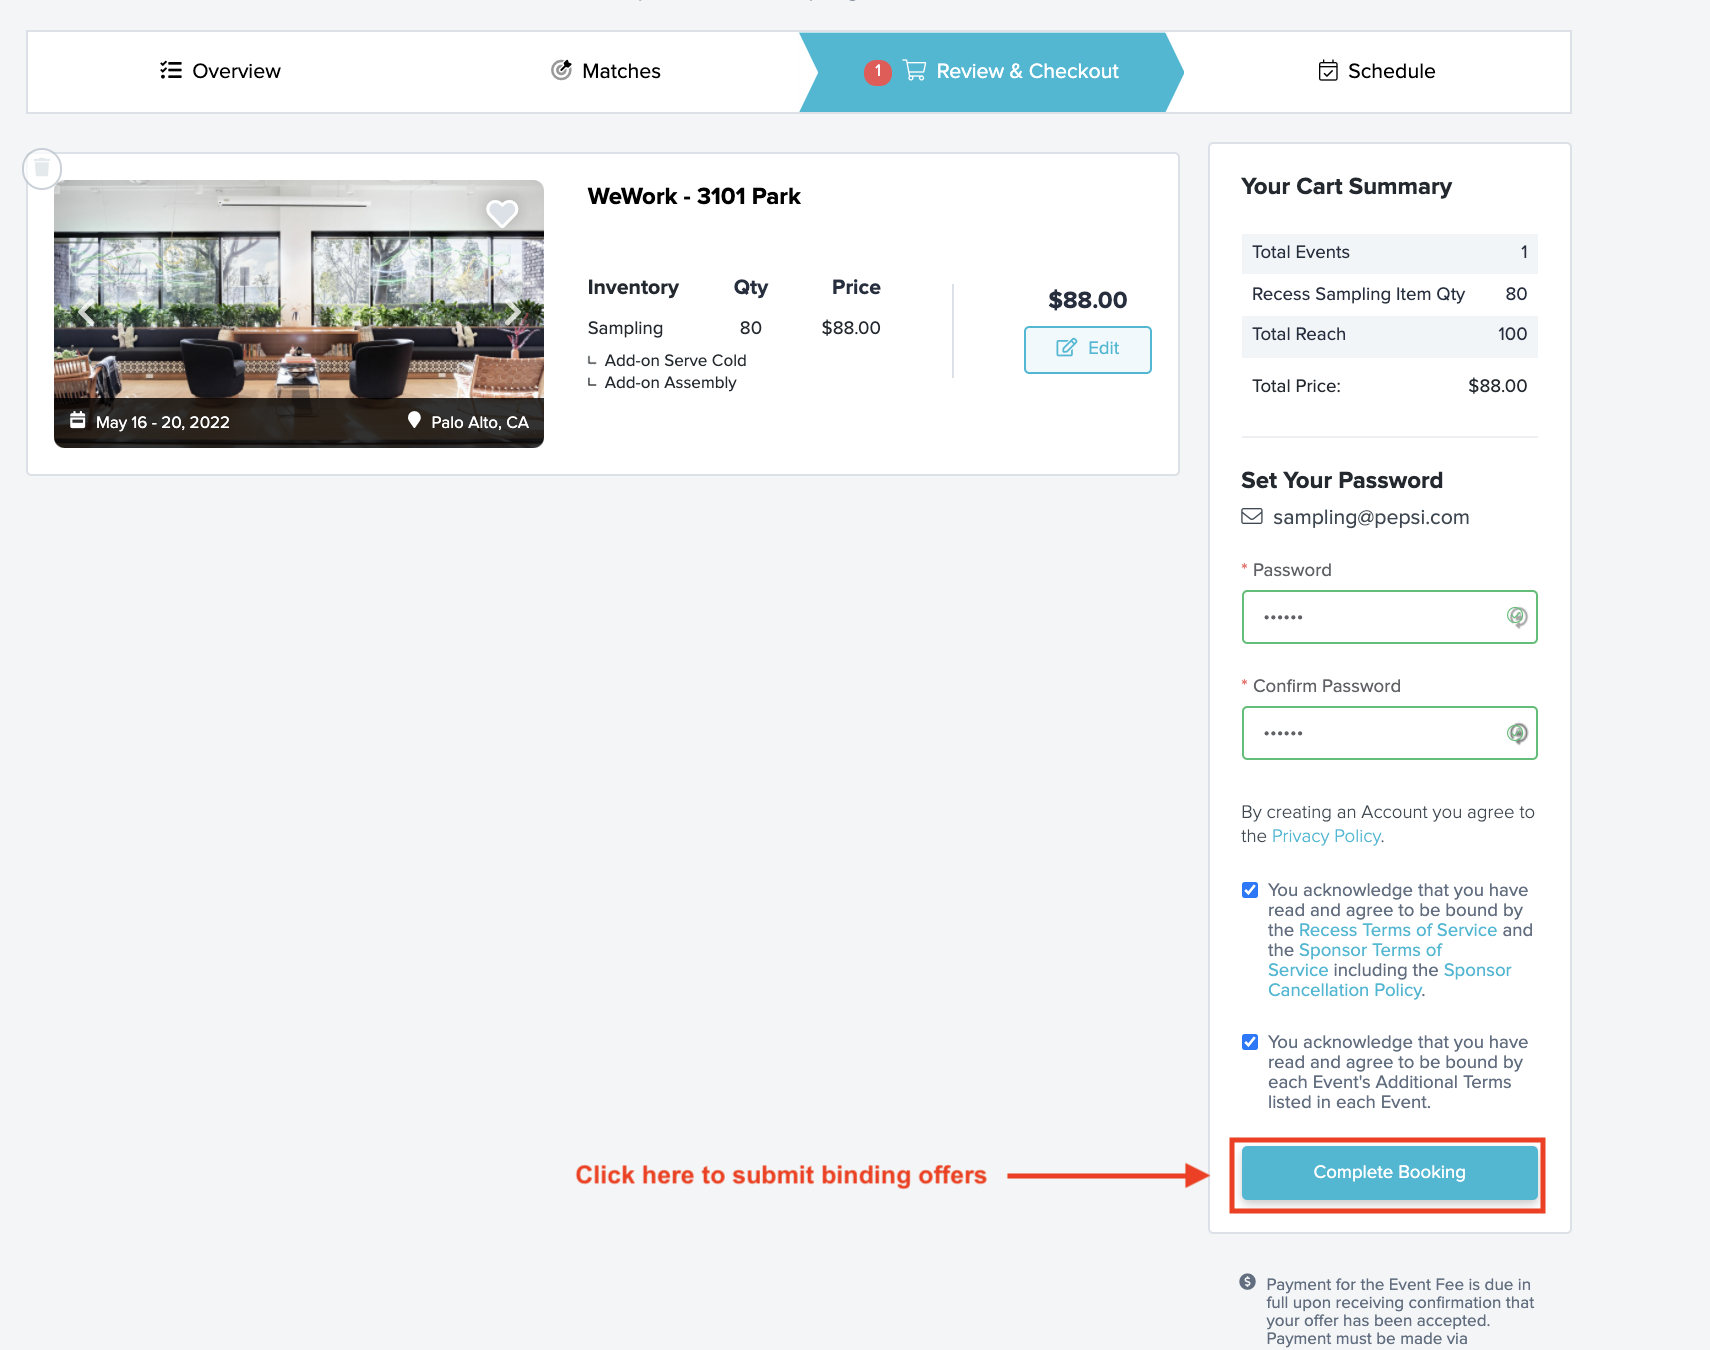
Step 11 - Set your Password
Set your password to complete your account registration.
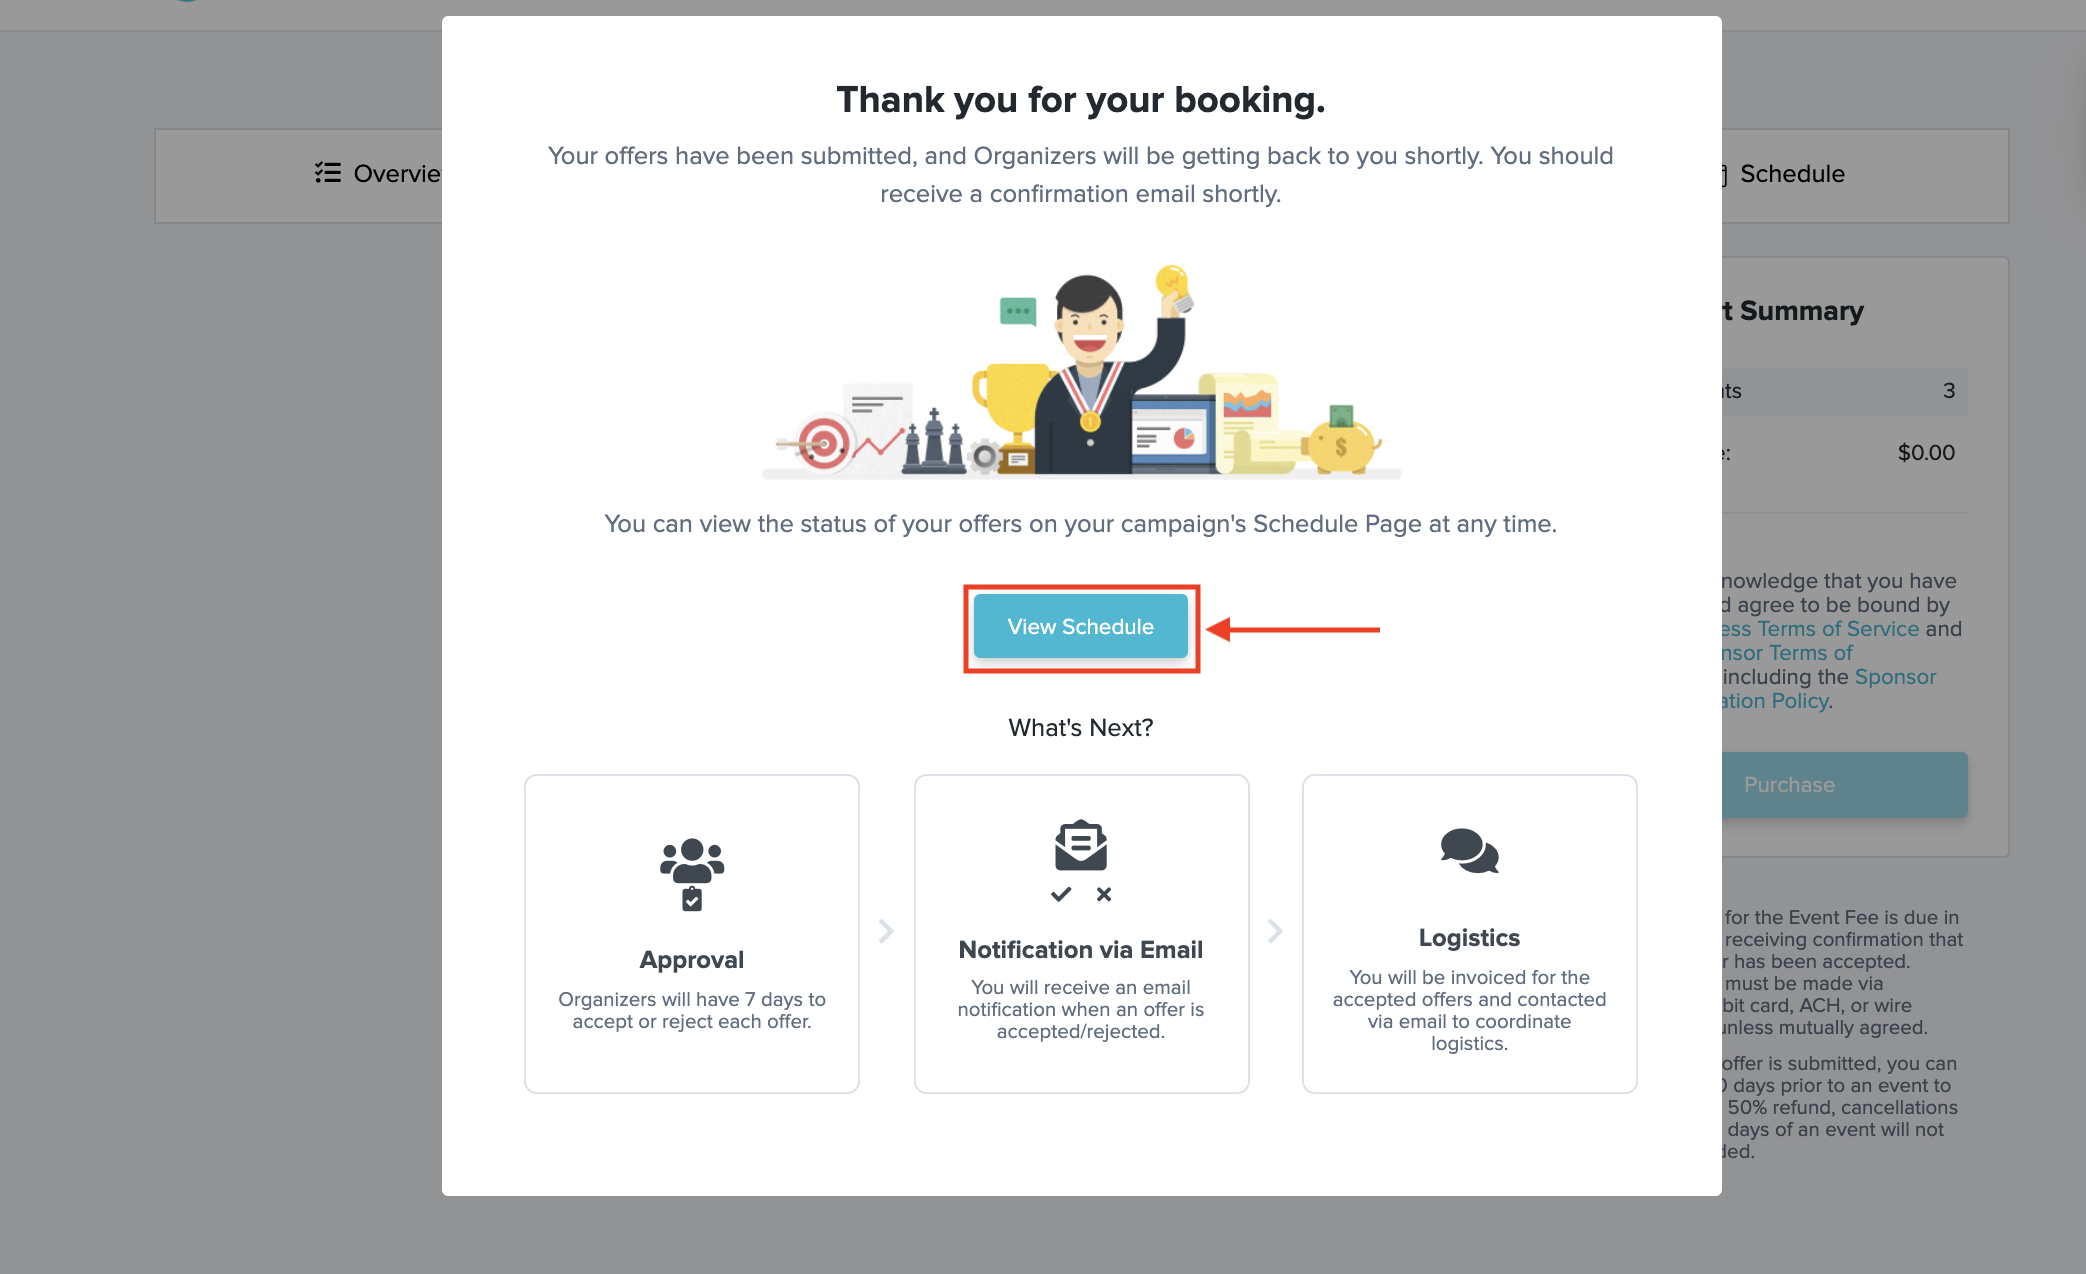
Step 10 - Complete Checkout
Review your Carty and if you are ready to submit binding Offers for WeWork to review and choose to accept or reject, click the checkboxes agreeing that you have read all the terms, and click 'Complete Booking' to submit binding offers to WeWork.
WeWork will have 7 days to review and choose to accept or reject each offer. Once all of the offers are accepted or rejected you be will be invoiced for the total amount of accepted offers and payment is due upon receipt via credit card or ACH payment.
Step 11 - View Offer Status
Once you complete your booking, WeWork will receive a notification and be able to review and choose to accept or reject each offer. You can view your offer status on the Schedule tab.
On the schedule page, you can filter by offer status to see which of your offers are submitted, accepted, denied, or canceled.
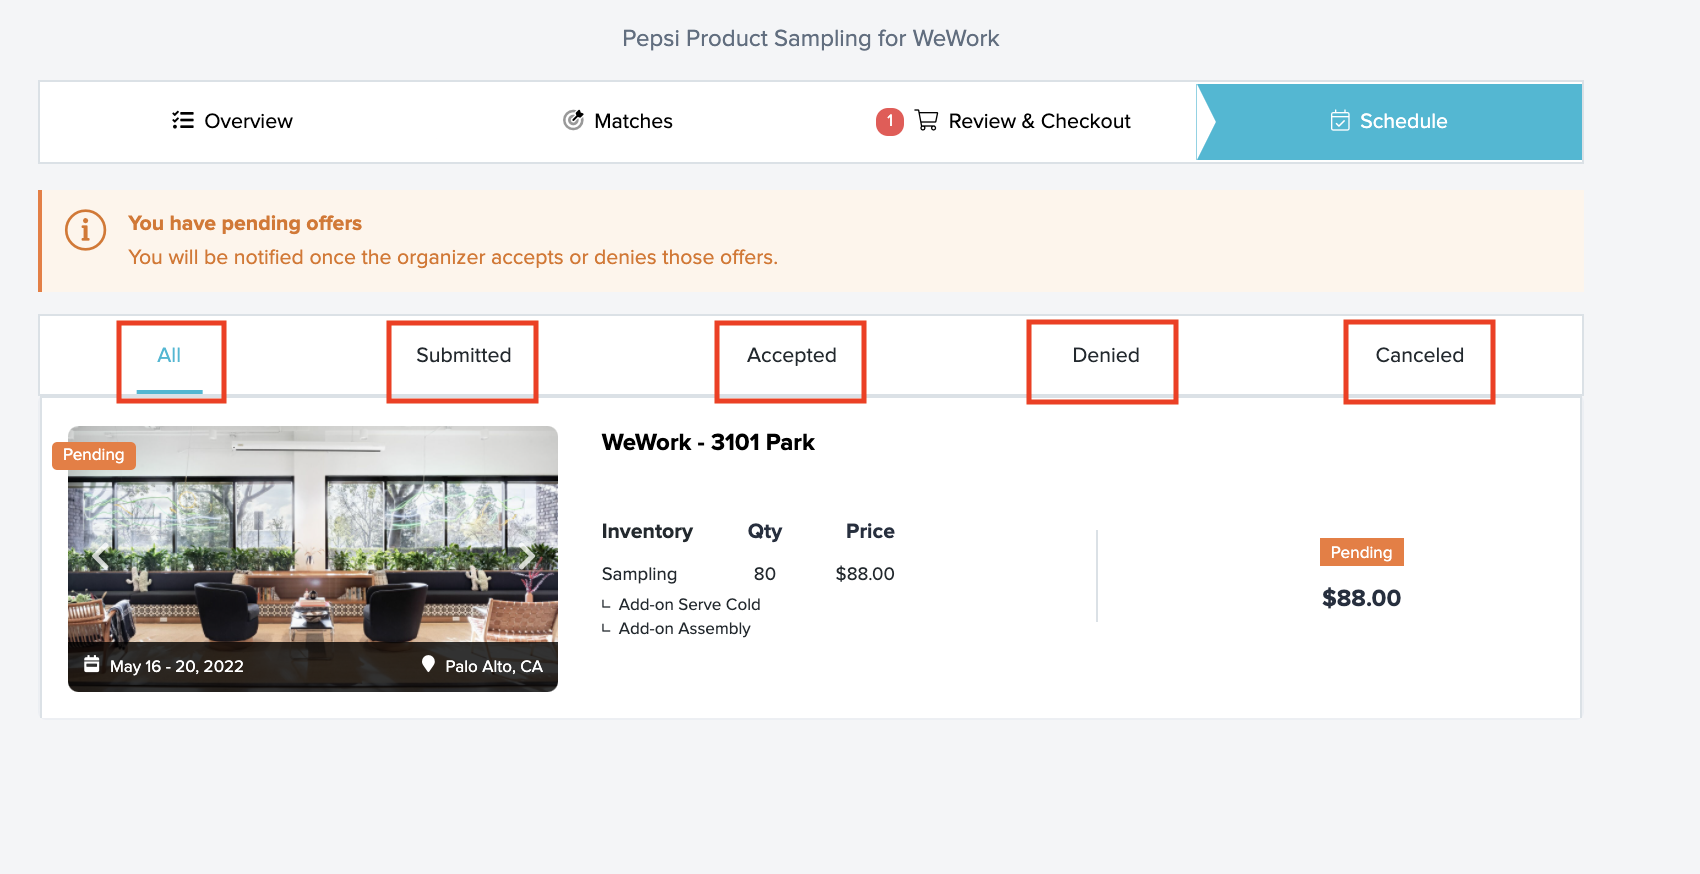
Step 12 - Offer Notifications
Once an offer has been accepted or rejected, you will receive an email notification and the status of your offer will be updated on the Schedule page.
You will be contacted by a Recess representative within (48) business hours to help coordinate the logistics for each booking.